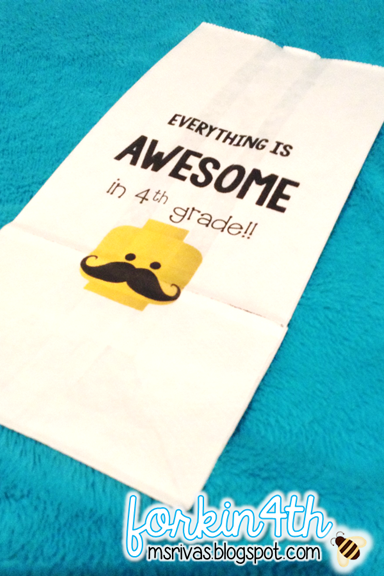
I don't know if I was the only teacher who experienced this, but my class would break out into singing the Lego movie chorus spontaneously on Friday afternoons in the computer lab starting in February when the movie premiered in theaters. "Everything is Awesome" became our unofficial class song because as soon as somebody started with Everything... the whole class would be harmonizing along before it ended! I actually quite enjoyed it because I love including songs and music throughout the day, plus I thought it had a good message for kids (side by side ... working together).
There in lies the inspiration for my new and improved Student Welcome Gifts looking quite AWESOME in my opinion. I've been doing these goldfish bags for the past 3 years and was ready for a change.
Last year, I moved to a new school and our site mentor used white paper bags to contain all her safari-themed items for her student welcome gifts. On the outside of the bag, she had glued a nice poem framed in a jungle-esque border. I thought it was such a grand gesture to start off the year on a positive/exciting note having a cute goodie bag to take home with you from Meet the Teacher night.
While at Walmart, I had to pick up these bags ($1.67 before tax)... Fortunately, I had recently seen a blog post by Club Chica Circle on how to print on paper bags. Her tutorial is great at explaining how to load the bags into the printer to avoid the most mishaps. Initially, I forgot to flip the image upside down so that was fail #1. Next, I printed one at a time and was having great success and no jamming. So, I decided to load more than one at a time and request multiple copies be printed. Then, the printer began to jam and misfeed - so back to one at a time to keep my printer happy. In the end only 5 bags were lost to the recycling bin.
On the keepers, some of the ink smudged (but let's be honest, I don't think the kids will mind) - plus it adds a bit of character. I was trying to help the planet by not being wasteful by tossing out some imperfect bags because of a few smudges here and there.
Inside each bag, students will receive an owl fridge magnet (see original post here), the best fruit snack ever because it's made by Black Forest (who knows gummy better than them?), and a groovy 'stache detailed further below. I say I'd be one ecstatic kid going back to school if I knew these gifts were waiting for me!
Boys are getting the green mustache cards inside their goodie bags. Since I have 11 boys and 13 girls, 1 gal will get a green 'stache while the rest get pink. Because of that, I needed to be able to identify "boy" bags vs. "girl" bags. So, I put together two different designs - here's the template if you'd like to have for personal use. Make sure to follow the printing tutorial I mentioned above if this is a project you decide to tackle.
Disclaimer: All images were found licensed and labeled for reuse through google images. I am in no way making a profit off these gift bags inspired by The Lego Movie. "LEGO®is a trademark of the LEGO Group of companies which does not sponsor, authorize or endorse this content."
Made-It #2: Mustache Student GiftsWell, in addition to the obsession with "Everything is AWESOME" our second obsession was with the humorous little mustache. Take a look at the new "Congrats, You're an Official 4th grader" proclamations complete with stache swag.
Summer clearance at Hobby Lobby means quite the bargain find for me. It was perfect since I needed enough for 24 students and there just happened to be two packs left in the store to meet my needs!
Here's how I turned it into the official announcement cards. Use mailing labels (30 to a page - type up what you want it to say), gather cardstock you'd like to use - I never used the leopard pattern in my animal prints pack and purple just happens to be one of our school colors! Then, use hot glue to adhere the sticker backs to the square card.
Made-It #3: Notebook Ribbon Markers
We use composition notebooks for grammar and writing. When I did notebook checks, I'd have students place a sticky note on the page of the assignment I would be checking for. Well, now that I know how often I checked these notebooks last year, we went through A LOT of sticky notes. Not to mention, some sticky notes managed to wriggle their way out of the notebook before I got to it, making it an ineffective system for some. Have no fear, pinterest sent me the solution to this pesky problem here!
Made-It #4: Labeled Lunch Tub
I inherited a pretty beat-up blue lunch tub from the former teacher who's room I was given, and never quite got around to relabelling it. So all last year my lunch tub had the old teacher's last name. Found these letters while in the Duct tape aisle at Hobby Lobby and I think they're a fabulously new product, perfect for labeling my new white lunch tub.
You may notice these large plastic tub from the summer section at your local Target, we use these to tote the lunchbags down from the classroom to the cafeteria. I love how the letters look similar to the Felt font I'm obsessed with!!
Made-It #5: Compliment Can
Earlier this summer I had pinned Funky in Fourth's compliment card freebies. I knew I had wanted to do some sort of class bucket-filling container, and this was perfect for naming my clearance find. Picked up this cute canister for just $3 - 80% off from Hobby Lobby!!
Just tied some funky black and silver ribbon on the handles and hot-glued the sign - I love it!!
Can't wait to see what crafty projects the rest of you have been up to lately over at 4thgradefrolics' linky!


